
Dishwasher and Ice Maker Leaks: The Slow Water Damage Cedar Rapids Homeowners Miss
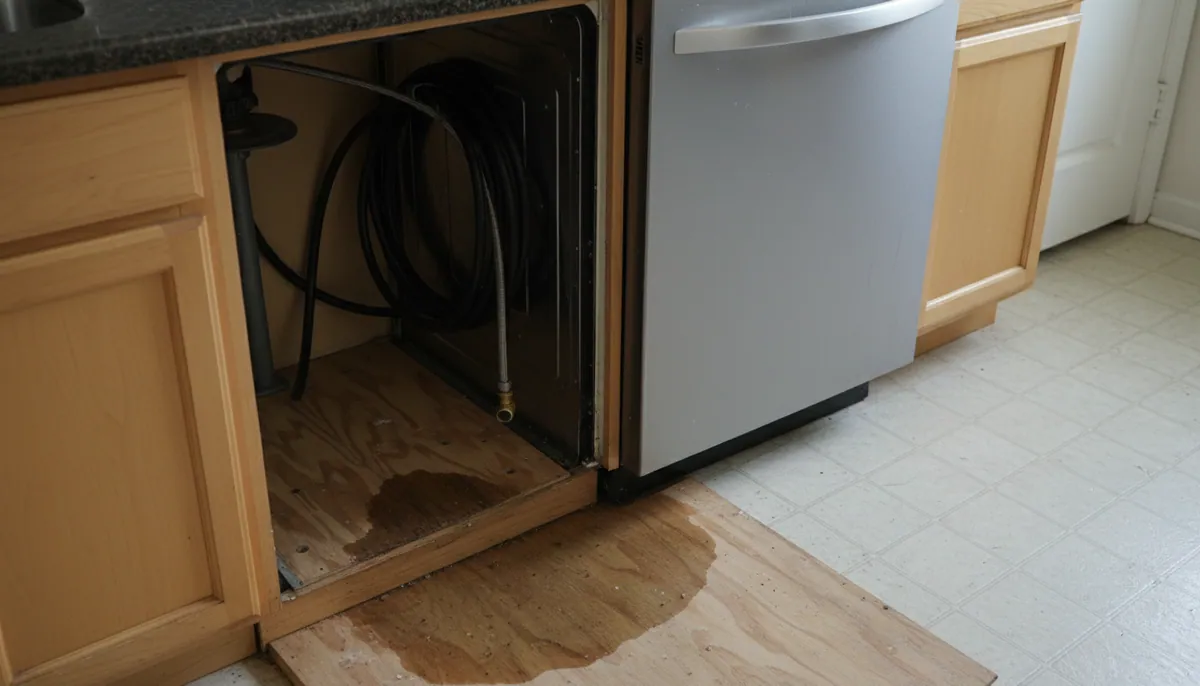
Everyone worries about the dramatic failures. A washing machine hose letting go at full house pressure, a water heater tank rupturing — hundreds of gallons an hour, obvious, alarming, and dealt with straight away.
The kitchen leaks nobody worries about do more damage per dollar of repair than either of those, because they are measured in cups per day and they get years to work.
Why Slow Leaks Cost More Than Fast Ones
A fast leak is loud. Someone hears it, sees it, or steps in it within hours, the water is on a hard surface where it can be extracted, and response speed limits how far it travels.
A slow leak is silent, and it starts in the worst possible place: underneath a cabinet run, on a subfloor, in a dark enclosed cavity with no airflow. Every one of those conditions favours the water.
- It has unlimited dwell time. Materials do not need volume to fail, they need duration. Subfloor that is repeatedly wetted delaminates whether it took a hundred gallons in an hour or a hundred gallons over a year.
- It grows mold with nobody watching. A dark, enclosed, consistently damp cavity with cellulose materials is close to an ideal culture environment.
- It travels along the path of least resistance. Under the cabinet base, along the subfloor, into the wall plate, sometimes into the joist bay and down to the basement ceiling.
- It complicates the claim. Insurers treat sudden discharge and long-term seepage very differently.
The Dishwasher: Four Failure Points
The door gasket. Rubber that gets slammed several thousand times and steam-cycled at high temperature eventually hardens and stops sealing at the bottom corners. Water runs down the inside of the door, past the seal, and under the unit. Look for a thin damp line on the floor right at the door edge after a cycle.
The supply connection. The line coming in under the unit, usually at a 90-degree elbow. Vibration and age loosen it. A drip here goes straight down into the subfloor under the machine, where there is nothing to see without pulling the unit out.
The drain hose. Cracks at the clamp, or works loose from the disposal connection. Water arrives inside the sink cabinet, which at least is visible if you look.
The tub itself. Stainless tubs can develop pinholes at the seam over many years; plastic tubs can crack. Less common, and effectively terminal for the machine.
The Ice Maker Line: Three Failure Points
The saddle valve.This is the one to know about. A saddle valve clamps around an existing copper line and drives a small needle through it to tap water. It was designed as a quick installation method and it is widely regarded as a temporary fitting — the needle seat corrodes, the rubber gasket hardens, and it weeps. Millions of kitchens have one. If yours does, replacing it with a proper tee and shutoff is a worthwhile hour of a plumber's time.
The plastic tubing. Older ice maker lines are quarter-inch poly tubing. It becomes brittle with age and cracks — particularly where the refrigerator has been pushed back against it and kinked it.
The connection at the fridge. Compression fittings loosen with vibration and with the movement of pulling the unit out and back for cleaning.
The reason ice maker leaks do so much damage is location: directly behind a heavy appliance, on a floor nobody sees, against an exterior wall in many kitchens. The water goes into the subfloor and the wall plate, and the first symptom is often flooring lifting several feet away.
The Signs, Which Are Subtle
- Flooring that has changed near an appliance — laminate edges swelling, vinyl plank lifting at a seam, hardwood cupping, tile grout darkening in a patch.
- A cabinet toe kick that is soft, stained, or separating at the bottom.
- A musty smell that is strongest at floor level near the dishwasher or fridge. Crouch down and check — your nose is a genuinely good instrument here.
- A stain on the basement ceiling below the kitchen. This is the most reliable early warning in a house with an unfinished basement, and it is worth looking up there occasionally for exactly this reason.
- A water bill that crept up without a change in usage.
- Ants or silverfish in the kitchen. They are looking for moisture, and they found some.
The Ten-Minute Check
Twice a year, ideally with the furnace filter change:
- Pull the dishwasher toe kick panel. Usually two screws. Shine a light underneath — you are looking for staining, mineral crust, or damp subfloor. Run a hand along the supply and drain connections.
- Run a cycle and watch the door. Check the bottom corners of the gasket during the wash phase.
- Pull the fridge out. Look at the floor where it was, check the tubing for kinks and brittleness, and put a hand on the saddle valve fitting.
- Open the sink cabinet and check the drain hose connection and the shutoffs.
- Look at the basement ceiling below the kitchen if you can see the joists.
Cheap Prevention
- Replace saddle valves with a proper tee and quarter-turn shutoff. The most valuable item here.
- Swap plastic ice maker tubing for braided stainless line.
- Put a battery leak sensor under the dishwasher and behind the fridge. Around $15 each, and they turn a year-long leak into a next-morning one.
- Leave clearance behind the refrigerator so the line does not kink when it is pushed back.
- Close the dishwasher supply valve before extended trips.
If You Find One
Photograph the failed component before touching anything — that photo is the difference between a sudden-failure claim and a maintenance denial. Close the supply. Then get an honest assessment of how far the water actually went, because with these leaks the visible damage is reliably the smallest part of it.
Subfloor, cabinet base, wall plate, and the joist bay below all need checking with moisture meters rather than by eye. If it has been running long enough to swell a cabinet base, it has been running long enough for growth in the cavity, and that changes the scope. Call and we will map what it reached before anyone starts pulling cabinets.